
How to Use The Sketchnote Handbook by Mike Rohde to Create Sketchnotes from Business and Life Situations
Sketchnoting is a creative and visual way to capture ideas, concepts, and stories. Mike Rohde’s The Sketchnote Handbook is an excellent guide for beginners and advanced practitioners. Here’s a step-by-step process to use the book to create sketchnotes for real-world situations:
Step 1: Understand the Basics of Sketchnoting
- Familiarize Yourself with Sketchnoting Tools:
- Use simple tools: a pen and a notebook.
- Experiment with markers and colors for emphasis.
- Example: For a business meeting, you might use black for main content and blue or red to highlight key points.
- Learn Basic Shapes:
- Master basic shapes like squares, circles, lines, arrows, and stick figures. These are the building blocks of sketchnotes.
- Example: A business workflow can be represented by a series of arrows connecting different steps.
- Embrace Imperfection:
- Sketchnoting is about capturing ideas, not creating perfect art. Mike Rohde emphasizes “idea, not art.”
- Example: During a brainstorming session, focus on the flow of ideas rather than detailed drawings.
Step 2: Practice Core Techniques
- Use Structure:
- Choose a structure that suits your situation: linear, radial, modular, or grid-based.
- Example: Use a radial structure for mapping the agenda of a business strategy meeting.
- Develop Visual Vocabulary:
- Create icons for common concepts like “growth” (upward arrow), “teamwork” (group of stick figures), or “decision-making” (question mark).
- Example: For a life coaching session, use a light bulb icon to signify ideas or breakthroughs.
- Incorporate Typography:
- Use different fonts, sizes, and weights to emphasize important words or sections.
- Example: Write “KEY POINT” in bold or all caps to highlight takeaways in a presentation.
- Leverage Containers:
- Draw boxes, clouds, or banners to group related content visually.
- Example: During a project meeting, group action items inside a checklist-style container.
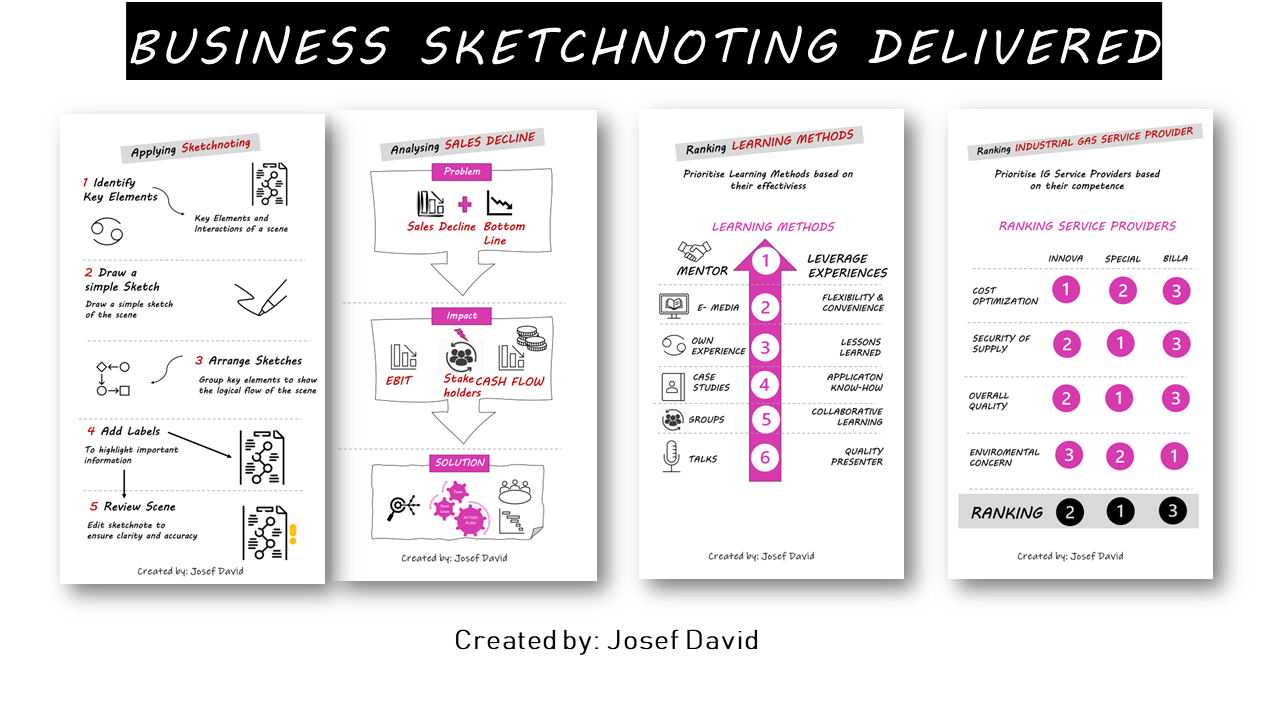
Step 3: Apply Sketchnoting to Business Situations
- Sketchnoting a Meeting:
- Divide the page into sections: Date, Meeting Title, Attendees, Key Points, and Action Items.
- Example: For a team meeting, sketch a flowchart of the discussed process improvements.
- Capturing a Presentation:
- Identify the structure (e.g., introduction, main points, conclusion).
- Use icons and diagrams to summarize key ideas.
- Example: In a marketing presentation, use a funnel to represent customer acquisition stages.
- Documenting a Brainstorming Session:
- Use a mind map structure to connect ideas and suggestions visually.
- Example: Sketch branches with different colors for each participant’s ideas.
Step 4: Apply Sketchnoting to Life Situations
- Journaling Daily Events:
- Sketch moments from your day: meals, tasks, or emotions.
- Example: Use a smiley face to depict a happy moment or a coffee cup to signify a break.
- Goal-Setting:
- Visualize goals with timelines, progress bars, or pie charts.
- Example: For a fitness goal, sketch a progress tracker with milestones.
- Planning Events:
- Create a visual to-do list or event map.
- Example: For a birthday party, sketch out a timeline, guest list, and decoration ideas.
Step 5: Experiment and Iterate
- Experiment with Layouts:
- Try different layouts for various situations.
- Example: Use a storyboard format to plan a product launch.
- Review and Refine:
- Review your sketchnotes to identify what worked well and areas for improvement.
- Example: After a conference, refine your notes to create a polished summary.
- Combine with Digital Tools:
- Use apps like Procreate or Adobe Fresco to digitize and enhance your sketches.
Examples from The Sketchnote Handbook
- A Conference Talk:
- Mike Rohde provides examples of capturing speaker quotes, diagrams, and key points with simple visuals.
- Adapt this to capture lessons from leadership or motivational speeches.
- Problem Solving:
- Use Rohde’s frameworks to visually brainstorm solutions for life or business challenges.
- Storytelling:
- Capture personal anecdotes or customer journeys in a comic-like sequence.
By practicing the techniques in The Sketchnote Handbook, you can create engaging, memorable sketchnotes for any situation in business or life. The key is consistent practice and experimentation!
Here’s how you can Sketchnote “Am Abgrund” (a “Show and Tell” or any event with multiple themes, ideas, or visual storytelling) step by step:
1. Prepare for the Sketchnote
- Understand the Theme: Am Abgrund (translated as “On the Brink”) might deal with themes like tension, challenge, turning points, or critical situations. Set a mental framework to capture these.
- Gather Tools:
- Notebook, markers/pens, or a digital tool if you’re using a tablet.
- Leave space to add visuals later if it’s happening live.
2. Choose Your Layout
Based on The Sketchnote Handbook, pick a structure:
- Radial Layout: Good for central themes branching into subtopics.
- Storyboard Layout: Best for sequential storytelling (like scenes in Am Abgrund).
- Grid or Modular Layout: Perfect if “Show and Tell” has distinct sections or speakers.
3. Create Sections for Key Elements
For a “Show and Tell” setting like Am Abgrund, break your sketchnote into these sections:
- Title and Main Theme:
- Draw the title “Am Abgrund” in bold letters or dramatic typography. Use jagged edges or imagery like a cliff or cracks to emphasize the theme.
- Example: A person standing near a cliff edge or teetering over a brink.
- Scenes or Subtopics:
- Sketch out different “moments” or “key takeaways” as they’re presented.
- Example:
- If the scene depicts a critical moment, sketch a clock, broken bridge, or a suspenseful visual.
- Use dialogue balloons for quotes or impactful lines.
- Key Emotions or Messages:
- Highlight emotional tones: tension, fear, hope, or resolution.
- Example: Use stick figures to show people reacting – stressed, angry, or relieved.
- Conclusion or Lessons:
- End your sketchnote with the resolution or what the audience should take away.
- Example: A symbol of hope (sunrise, handshake) or transformation (person walking away from the brink).
4. Enhance with Visual Vocabulary
- Icons for Concepts:
- “Brink” or tension: A cliff, tightrope, jagged line.
- Solutions: Lightbulb, ladder, or lifeline.
- Fear or suspense: Eyes wide open, shaky hands, or storm clouds.
- Typography:
- Write keywords or phrases from the presentation in bold or uppercase for emphasis.
- Example: “CRISIS” can have dramatic spiky letters.
- Arrows and Connectors:
- Use arrows to show transitions between scenes or decisions.
- Example: An arrow showing a person walking away from a dangerous edge.
5. Make It Visually Dynamic
- Use Space Wisely:
- Keep some areas open to avoid clutter, like the edge of a cliff in the scene.
- Colors and Shading:
- Red for danger or critical moments.
- Blue for calm or resolution.
- Doodles and Humor:
- Add small, relatable sketches to lighten heavy topics.
- Example: A tiny stick figure yelling, “Help!” on the cliff.
6. Examples of Sketchnote Moments in “Am Abgrund”
- Scene: A Critical Choice:
- Sketch: A person holding two signs (“Risk” vs. “Safety”).
- Add quote: “On the brink of failure lies the edge of success.”
- Scene: Overcoming Challenges:
- Sketch: A ladder reaching across a gap.
- Add keywords: “Trust,” “Collaboration,” “Hope.”
- Scene: Final Resolution:
- Sketch: Sunrise over the cliff with the caption: “A new beginning.”


7. Review and Refine
- Add small details like speech bubbles, captions, and icons.
- Share the sketchnote as part of the “Show and Tell” – either physically or digitally.
By following these steps, you’ll have a dynamic and memorable sketchnote for Am Abgrund that captures the themes, emotions, and storytelling of the event.